(SPEECH)
[00:00:00.00] [MUSIC PLAYING]
(DESCRIPTION)
[00:00:00.00] Text, L.L. Bean, How to chose a sup. Kevin, L.L. Bean Instructor.
(SPEECH)
[00:00:05.17] Hello, I'm Kevin. I work for L.L.Bean's Outdoor Discovery Programs. And we're here at our Lower Flying Point Paddling Center. We're going to talk to you today about types of paddle boards-- stand-up paddle boards, and how to use them, and what might be the right one for you.
[00:00:16.73] So this is a great board for beginners starting out in stand-up paddle boarding. This is our L.L.Bean Breakwater. It's out of an Eastex construction. It's a beautifully constructed board. It has some nice length and width to the board with volume built in. So it's great for beginners when they start off.
[00:00:31.07] This is a great board you can bring up to camp and just be paddling around in a nice protected cove. You could, also, be sitting there and watching the nature around you. Might even try a little bit of yoga or a little bit of fishing off this board.
[00:00:41.95] So here's a couple examples of stand-up paddle boards that you can surf with this. This is a Performer by BIC that's a Tough-Tec material that's super durable. You can see, these boards are both shorter and wider. They have some good stability to them, but great maneuverability.
[00:00:56.35] On the bottom of this big board right here, you can see there's up to five fins you can put in there. And the different fins are for tracking and maneuverability. So depending on your wave conditions and the sets coming in, you can change them to either have better maneuverability or better tracking, or a little bit of both.
[00:01:12.24] So this is a touring stand-up paddle board. In this category, there's also race boards, which would be even longer than this, skinnier than this, lighter weight performance materials. And they carve through the water like a knife. With this touring board, it is a little bit trickier than the all-around board just because it's a narrower board, it has a little more thickness to it, and this displacement nose on the board.
[00:01:33.78] So when you get on this board at first, it may feel like it has a little wiggle to it. Yet, they carve through the water. They go much further distances, much faster because of their shape.
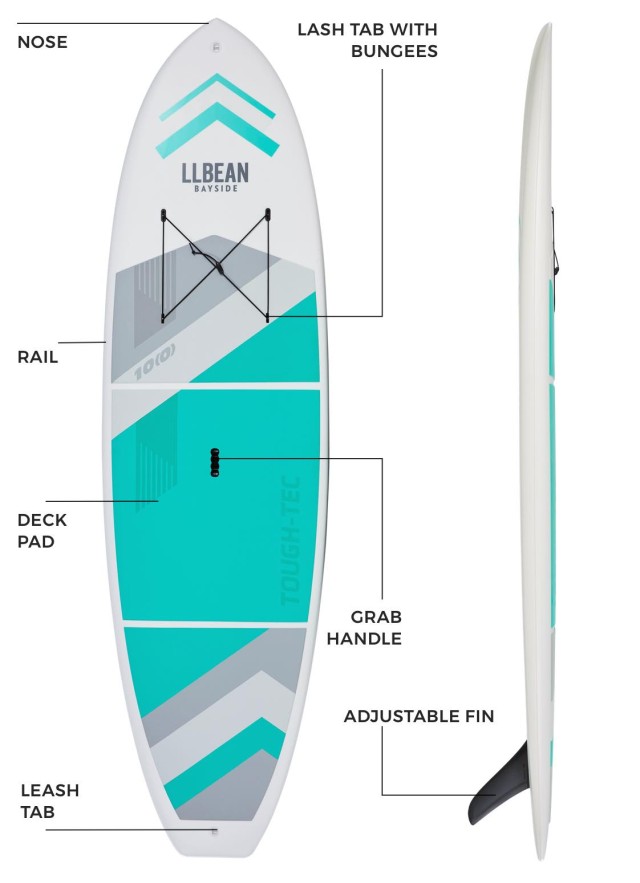
[00:01:42.90] So now, we'll talk about parts of a paddle board. So this is the nose of the board. The top surface here is the deck. This is, also, the deck pad that has some cushioning so when you kneel or stand, it is more comfortable on our feet.
[00:01:55.41] These are just some lash tabs with some bungee so you can put a little dry bag, a water bottle, maybe shoes there.
[00:02:01.01] This is the belly button or the grab handle. When we carry a board, we use our legs, sort of tip it up on the side, put a hand on the grab handle, and lift with our legs.
[00:02:10.70] Also, the edges of the board on both sides are called the rails. As we come back, the deck pad continues. And then this is the tail of the board. At the tail of the board is always a leash tab, which is where we put our surf leash.
(DESCRIPTION)
[00:02:23.72] He flips over the board.
(SPEECH)
[00:02:25.16] On the bottom of this board, this planing bottom, you can tell it just curls up towards the nose nice, smooth, and wide and stable. And then you have the fin. The fin has a center fin that is adjustable. You can put it more forward for a maneuverability or a little further back for better tracking. And it does have some side bite fins, too. Most dangerous part of the board can be the fin itself just because it's a hard fiberglass so just be cautious of that.
[00:02:49.49] There's two types of leashes. There's a straight leash, like this, that's straight and doesn't have any flex to it. This is to be used in the surf zone. It could, also, be used on flat water, but in the surf zone, it has to be used so it doesn't bounce back towards you. Opposed to the coiled leash that you can see, has a lot of stretch to it. A lot of people that are touring or on flatter water are going to use a coiled leash because it, also, will stay up off the board a little bit more and out of the water.
[00:03:14.79] So they have ones that are calf and also, ankle leashes, but let's show you how to put one on. These little pieces of Velcro, you open everything up. And we're going to attach it to the lash tab back here. Once I open it all up, I feed the first part through, bring that down, then the second part, and the third part over that. Since this one is a calf leash, I then would put it right-- open it up. Put it right around here just below my knee with that leash towards the back.
[00:03:44.10] So now, we're going to talk about parts of a paddle board paddle. So this is the palm grip or the T grip. And that does usually have one direction to hold it. There should be a spot for your fingers to curl over that's more comfortable than if you had it the wrong way, and then your fingers in the middle have no place to go. So palm or T grip.
[00:04:00.89] Shaft of the paddle that a lot of times is an adjustable. As the shaft connects to the blade, that's the throat to the paddle. And then the blades have two faces. They also are a canted blade so it means it has sort of a curl. The power face is this scoop-side, like a big ice cream scoop. And the back faces of the paddle has a little bit of a raised ridge called the spine. Power face, back face, those are parts of the paddle.
[00:04:26.33] [MUSIC PLAYING]
[00:04:26.66] So today, we talked about the different types of paddle boards. You always want to think about where you want to use it, what type of board you might need, and your experience level. The different types we talked about were surf's up, the all-around shapes, touring, or race boards. And then there's, also, inflatables, which are great for people who have limited space or car topping is an issue because they fit down into a backpack. So the most important thing when we get out there is to be safe and have a lot of fun. Hope to see you on the water soon.
(DESCRIPTION)
[00:04:55.57] Kevin paddles far into a peaceful lake. Logo, L.L. Bean. Text, Be an outsider.
[00:05:03.75] Four people climb a rocky mountain at sunset. The girl at the front of the line leaps in mid-air. The sun glows far off on the horizon.
Stand up paddleboards – commonly known as “SUPs” – look like surfboards, but are designed to be paddled from a standing position. That hybrid may sound confusing, but don’t worry – SUPs are easy to use and a great way to get on the water. Here’s what you need to know to get started.
Types of SUPs
Recreational SUPs are great for beginners – perfect for paddling on ponds or protected coves. They’re long, wide and stable enough that you can even do yoga or fishing on them.
Surfing SUPs are shorter and wider, with additional fins for better tracking and maneuverability. They’re great boards for taking into the surf zone and carving some waves.
Touring SUPs are longer and narrower, with a displacement nose that really pushes water away. They’re designed to carve through the water and go further distances.
If you’re short on space, an inflatable SUP is a great option – it can be packed down small for travel or storage.
Parts of the Paddleboard
The front of your SUP is called the nose, and its shape will vary by board type; the back is called the tail; and the edges are called the rails.
The top of the board features a cushioned deck pad where you stand, which may have lash tabs with bungees for accessories (like a water bottle or shoes), and a “bellybutton” grab handle that you use to carry the board. The tail has a leash tab for a surf leash, which will keep the board attached to your leg.
On the underside, one or more fins at the tail can be adjusted to affect the board’s performance – forward for more maneuverability, or back for better tracking.

Parts of the Paddle
The top of the paddle, where you place one hand, is called the grip – typically a “palm grip” or “t-grip” for a SUP paddle.
Below the grip, you place your other hand on the adjustable shaft, which can be lengthened or shortened depending on your height.
At the paddle’s throat, the shaft attaches to a canted blade. The blade has two faces: the scooped side is the power face, which you want facing you; and the spined side is the back face, which you want facing forward.


